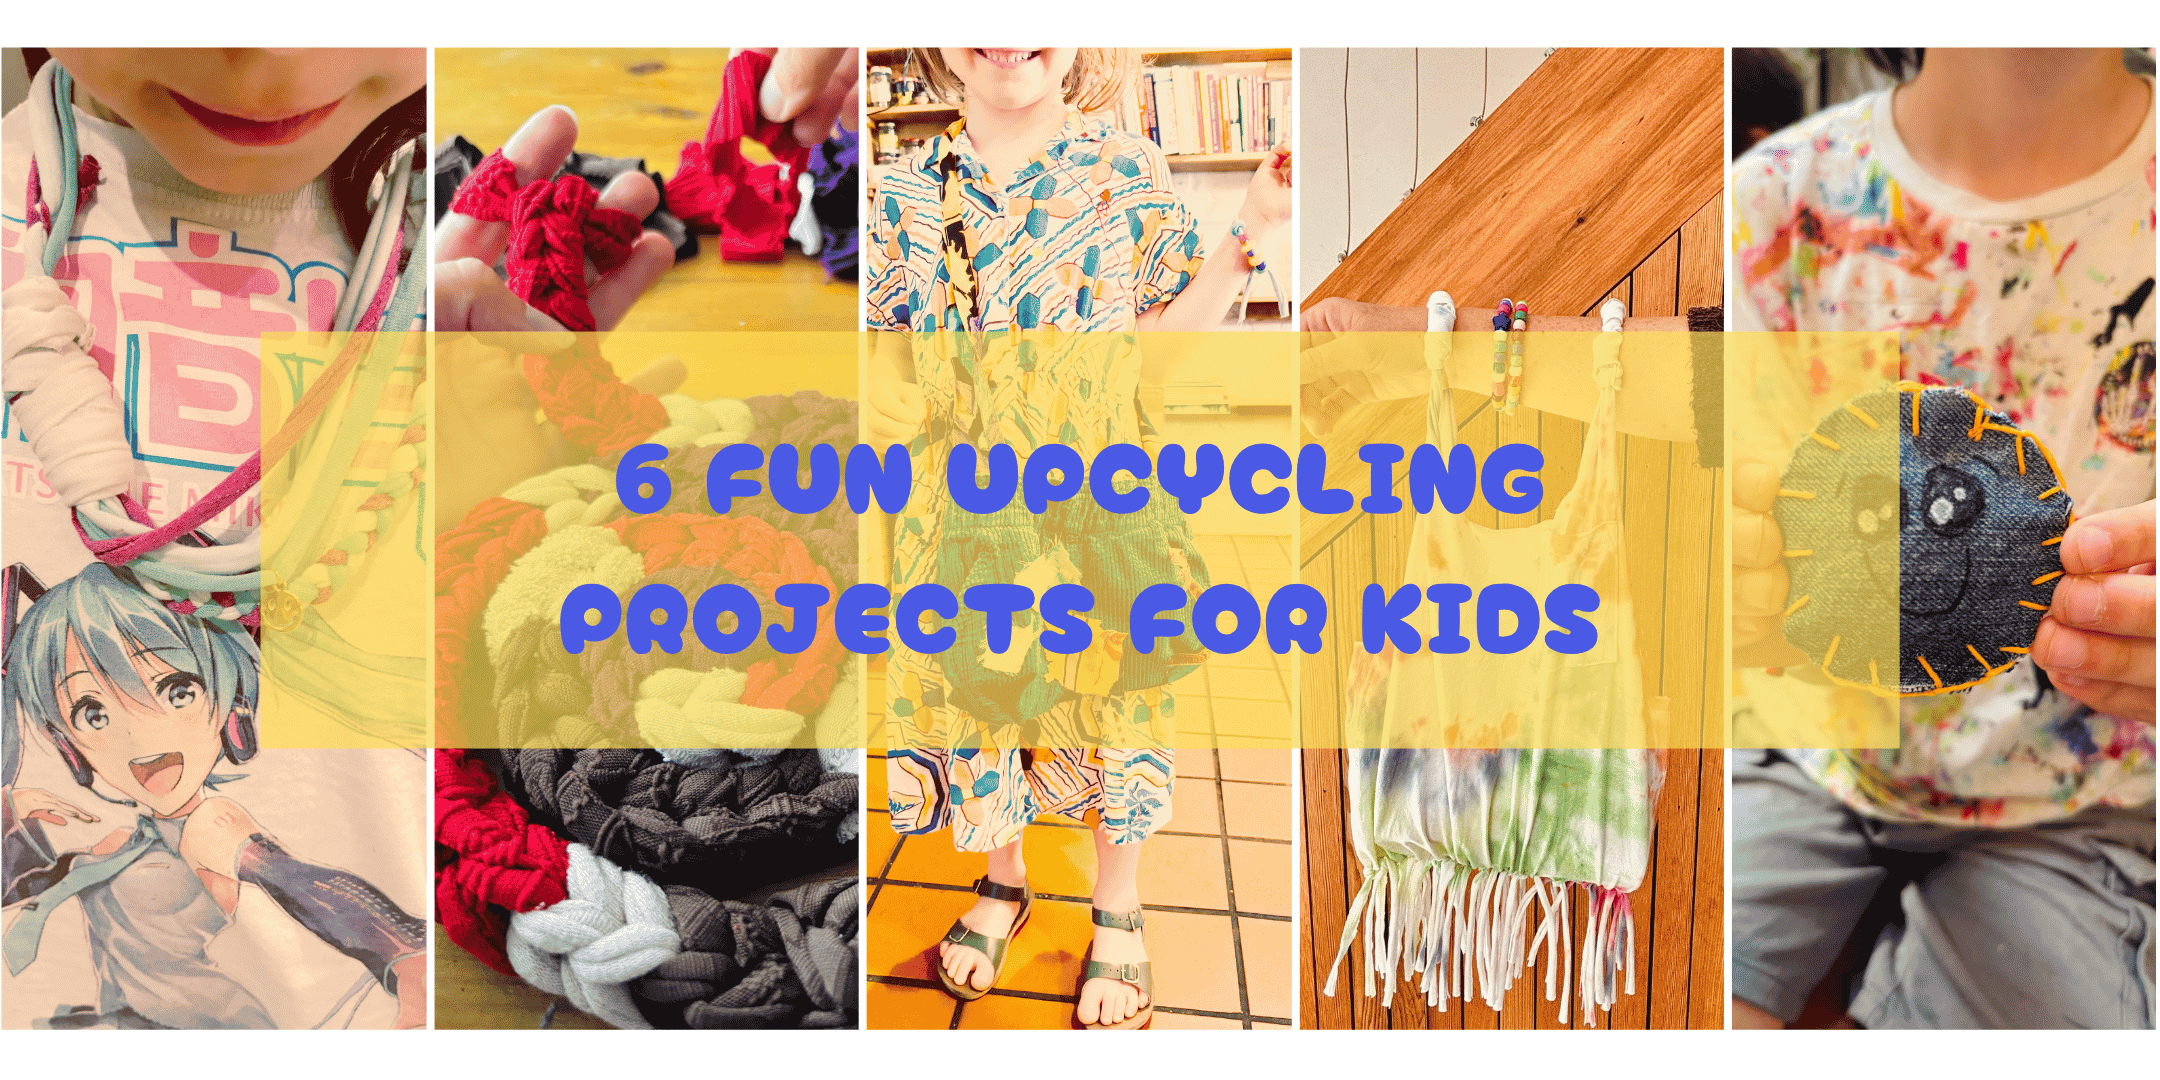
Six Fun Upcycling Projects to Do With Kids - Easy & Eco-Friendly!
I've gathered together six of my favourite upcycling projects that I've tested with children aged 5 to 10. The youngest children might prefer the no-sewing projects, although I've met plenty of five-year-olds who were very keen to sew!
These projects are great because you can reuse things you probably already have at home, and they can be adapted for different ages and abilities — from very simple projects to more detailed finishing touches. And, of course, adults can have just as much fun making them!
- T-shirt into a necklace — no sewing
- T-shirt into a reusable bag — no sewing
- Old tights and socks into loom knitting — no sewing
- Fabric scraps into seasonal decorations or pocket hugs
- Long sleeves into pouches
- Toddler trousers into a bag
So let me show you how easy each of these eco-fashion project is!
1. From T-Shirt to Necklace
You only need the bottom of a t-shirt for this project so you could even crop a T-shirt and you'd have enough to make a necklace with what you cut.
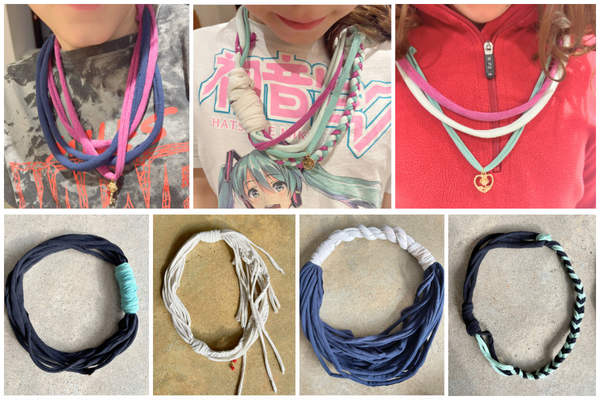
It was the theme of my first ever eco-fashion workshop! Boys and girls from 5 to 12 year old had fun cutting their old T-shirt and create their own stylish necklace. [To make it extra special, I also let them choose a charm to add to their creation]
What you’ll need
- T-shirt
- scissors
- hot glue gun (optional)
Instructions
- Choose your T-shirt. Grab an old T-shirt and a good pair of scissors.
- Remove the bottom hem. Cut off the bottom hem of the T-shirt, as this part isn't stretchy.
- Cut your loops. Cut the T-shirt horizontally into strips about 2–3 cm wide. Try to keep each strip as one continuous loop.
- Stretch the loops. Pull each loop gently. The fabric will curl in on itself, creating a long, thin T-shirt yarn.
- Create your necklace. You can keep the loops as they are, cut them to make longer strands, or combine several strands by braiding or twisting them. Mix and match and see what you like!
- Make a simple closure. Cut a small rectangle of T-shirt fabric. Tie it around the ends of your necklace, then roll or wrap it around the knot to hide it. Tuck the end of the fabric underneath the wrap to secure it.
And voilà! No sewing needed. If you want to make the closure extra secure, you can add a tiny drop of hot glue.
2. From T-Shirt to Reusable Bag
There are so many ways to reuse an old T-shirt, and turning one into a bag is one of my favourites. Again, no sewing is needed for this eco-fashion project, so it works really well for children from around five years old.
This is my favourite upcycling project for introducing children to eco-fashion. Using a piece of clothing that everyone is familiar with, a few simple cuts and some knots, they get to turn it into something completely different: a bag!
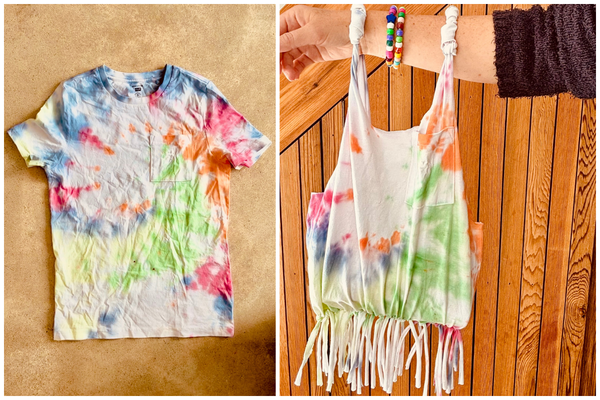
Check out this full video to see the entire process.
What you’ll need
- T-shirt
- scissors
- hot glue gun (optional)
Instructions
- Choose your T-shirt. Start with an old T-shirt and a good pair of scissors.
- Cut off the bottom hem. Remove the bottom hem of the T-shirt, as this part isn't stretchy.
- Cut off the sleeves. Cut along the sleeve seams to remove both sleeves. You can save the fabric scraps for another project!
- Create the bag opening. Cut around the neckline to make the opening of your bag. You can make the opening larger or smaller depending on the shape you want.
- Cut the fringe. Along the bottom edge, cut vertical strips about 2–3 cm wide and several centimetres long. Try to make the strips roughly the same width.
- Tie the bottom. Tie each pair of neighbouring strips together with a strong knot. Continue across the entire bottom of the T-shirt. For extra security, you can tie a second knot or tie the strips together in a way that closes any gaps.
Note: If you don't want the fringes, before tying the knots, turn your t-shirt inside out. So when you're done tying, turn your t-shirt the right way out and the fringes will stay inside.
3. Loom Knit Old Tights and Socks
Every kid goes through a loom-band phase, don't they? You know, those tiny elastic bands that children use to make colourful bracelets?
For this project, however, you don't need to buy any tiny elastics (you don't really need to buy anything at all). Instead, you can use old tights and socks.
All you need to do is cut them into small loops and use those loops in the same way you would use loom bands. If you don't know how to loom knit, don't worry — you can follow the same basic technique shown in the step-by-step photos below.
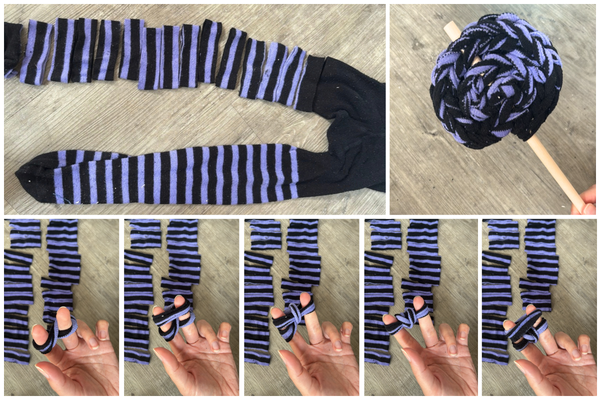
See how it looks in this video.
What you’ll need
- Some old tights and socks (preferably colourful ones)
- Scissors
Instructions
- Cut your tights and socks. Cut the tights and socks into loops about 1–2 cm wide.
- Double the loops if needed. If the loops feel too loose on your fingers, double them up to make them tighter.
- Start loom knitting. Use the loops in the same way you would use regular loom bands. Follow the technique shown in the photos or video above.
- Experiment! Try combining different colours and materials to create your own patterns and designs.
You can make useful things out of it, like rugs, chair cushions, pretend lollipop or just a really long snake to play with.
4. From Fabric Scraps to Seasonal Decorations / Pocket Hugs
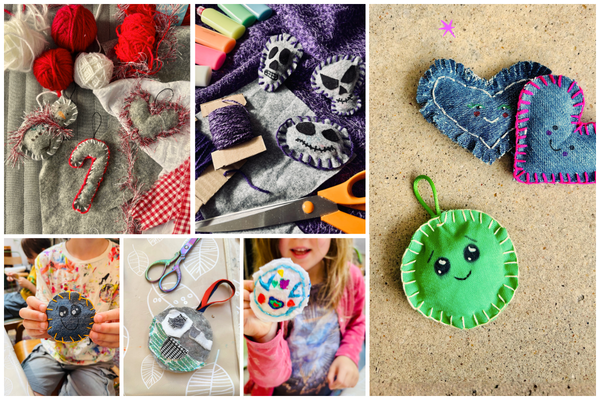
This project is SO versatile! With just two small pieces of fabric (the same shape) and a bit of thread, you can make Christmas baubles, spooky Halloween decorations, smiley keyrings or little pocket hugs to keep or give as gifts.
It's a small sewing project that has always kept my students entertained for at least an hour. Younger children might need some assistance, while older children can choose between different stitches to practise, such as running stitch, backstitch, whip stitch or even blanket stitch.
What you’ll need
- Two pieces of fabric in the same shape
- Small fabric scraps for stuffing
- Needle and thread
- Ribbon, yarn or cord (optional)
- Pens, paint or embroidery thread for decorating (optional)
Instructions
- Cut your fabric pieces Cut two pieces of fabric in the same shape and size.
- Decorate your fabric — optional. If you want to add drawings, paint or decorative stitches, it's easiest to do this before sewing the two pieces together.
- Add a hanging loop — optional. If you'd like to turn your decoration into a keyring or something you can hang up, make a small loop from ribbon, yarn or cord. Sew it securely to the wrong side of one of the fabric pieces using a couple of stitches.
- Sew the pieces together. Place the two fabric shapes together, with the right sides facing outwards. Sew around the edge using your favourite stitch, such as backstitch, whip stitch or blanket stitch. Leave a small opening, about two fingers wide, for stuffing.
- Fill with fabric scraps. Stuff the little shape with tiny fabric scraps. Add them gradually and gently push them into the corners until you're happy with the shape and firmness.
- Close the opening. Sew the opening closed, making sure your stitches are secure.
And that's it! You now have a little handmade decoration, keyring or pocket hug — all made from fabric scraps.
5. From Long Sleeves to Pouches
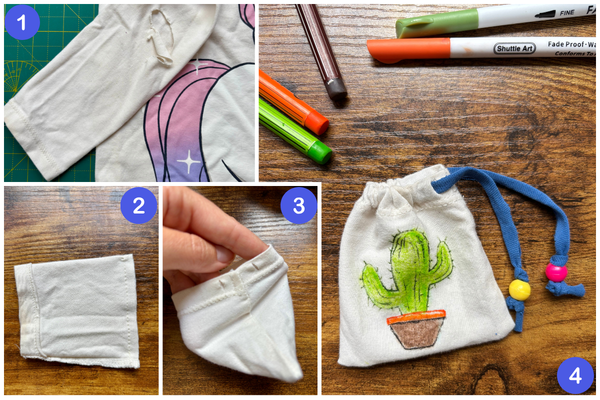
This upcycling project is super duper easy and makes a cute little drawstring pouch (who doesn't need a pouch?) using only the end of a long sleeve.
What you’ll need
- Long sleeve t-shirt
- T-shirt yarn / ribbon
- Safety pin
- Needle and thread
- Optional: beads and markers to decorate
Instructions
- Cut the sleeve. Cut off the end of a long sleeve to make a roughly square piece. There's no need to measure — just make sure you have enough fabric for the size of pouch you want.
- Sew the bottom of the pouch. Turn the sleeve inside out. Sew across the edge you just cut using a backstitch. This will become the bottom of your pouch.
- Turn your pouch right side out again.
- Prepare the drawstring channel. The original hem of the sleeve should already form a little tube or channel. Make two tiny slits in the fabric (by pinching the top layer of the fabric) near the vertical seam so that you can thread your cord through the channel.
- Thread the string. Attach a safety pin to one end of your T-shirt yarn or ribbon. Push the safety pin through the channel, all the way around the pouch, until it comes out through the other opening. Pull the string through and remove the safety pin.
- Finish your pouch. Pull both ends of the string to close the pouch and tie a knot at the ends to stop them from disappearing back into the channel.
- Decorate — optional. Your pouch is ready! Children can decorate it with fabric markers, add embroidery or thread beads onto the drawstring.
5. From Toddler Trousers to Bag
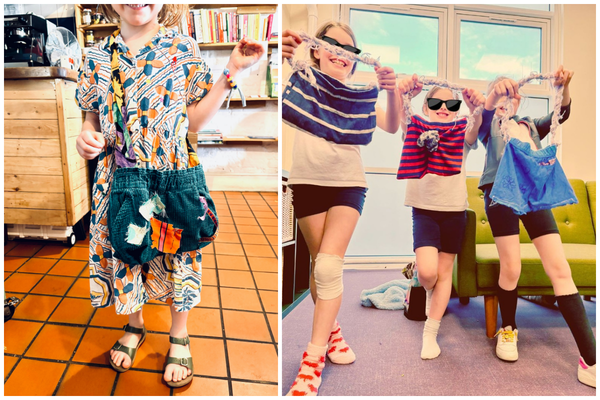
This upcycling project is always a hit. I once had a child come to my family upcycling workshop with their favourite pair of corduroy trousers, which had become too small. They were ready to give them a new life but weren't quite sure what to do with them.
When I suggested turning them into a bag, they immediately loved the idea! Simple and effective.
What you’ll need
- Small pair of trousers (toddler ones are perfect)
- Sewing machine
- Upcycled handle (see below for ideas)
Instructions
- Cut the trousers. Cut off the legs just below the crotch, leaving you with the top part of the trousers.
- Mark the sewing line. Turn the trousers inside out. Draw a straight line across the bottom, or use a piece of tape to mark where you need to sew.
- Sew the bottom of the bag. Sew along the line as straight as you can. A sewing machine is the quickest option, but strong backstitches will work too.
- Choose your handle. Turn the trousers right side out again. Your bag is almost ready! We've used lots of different materials with the children, including old belts, long pieces of fabric and T-shirt yarn that they can crochet or plait into a long handle.
- Attach the handle. One of the easiest ways to attach a handle is to make a small hole on each side of the bag, about 2 cm from the top edge. Thread the ends of your strap through the holes and tie a strong knot on the inside of the bag.Alternatively, you can sew a small loop made from ribbon or T-shirt yarn onto each side of the bag and attach your handle to the loops.
And there you have it — a little bag made from a pair of trousers that might otherwise have been thrown away!
That's if for today! All I'm hoping for is that I inspired you to try something new and have fun reusing and transforming with your child. I'd love to hear if you found it useful so don't hesitate to say hello on Instagram @wemakekidsclub!
Cheers,
Aurélie x